Back in the 1990s I was fascinated with electronic whiteboards. These things work like ordinary whiteboards on which you would write then press a button to print the content of the whiteboard for copying and distribution. It was better than taking a photograph, print or nowadays digital. The problem back then and still now is the prohibitive cost and that of the single format in the form of a physically printed page.
Now fast forward to 2014.
![]() Zamurai Mobile Whiteboard is an app for the Apple iPad that works like a whiteboard for projectors. You simply write, draw or attach images to your tablet whiteboard space and it shows up on the big screen during meetings or in lectures. It is better than a whiteboard – electronic or otherwise – because you don’t need to physically be at the board. The physical act of drawing and writing is translated on to gestures you make on a tablet surface. It will also automatically be saved on your device as a note, or to be used in future meetings or lectures, or else can be saved for distribution later in various useful formats. Finally you can supplement it with image icons and digital images to make electronic whiteboarding just like old fashion displaying of photos and pictures.
Zamurai Mobile Whiteboard is an app for the Apple iPad that works like a whiteboard for projectors. You simply write, draw or attach images to your tablet whiteboard space and it shows up on the big screen during meetings or in lectures. It is better than a whiteboard – electronic or otherwise – because you don’t need to physically be at the board. The physical act of drawing and writing is translated on to gestures you make on a tablet surface. It will also automatically be saved on your device as a note, or to be used in future meetings or lectures, or else can be saved for distribution later in various useful formats. Finally you can supplement it with image icons and digital images to make electronic whiteboarding just like old fashion displaying of photos and pictures.
So even if you are not in the same space with others but need to capture your thoughts to explain to others your ideas you can do it with Zamurai by creating your whiteboard then saving it as a PDF, digital image (jpg) or by sending it as a Zamurai whiteboard file to others with the Zamurai app.
User Interface
The user interface is dominated by the whiteboard workspace. All tools are within easy reach on the periphery. The primary work tools are along the bottom edge with the main tools in the centre.
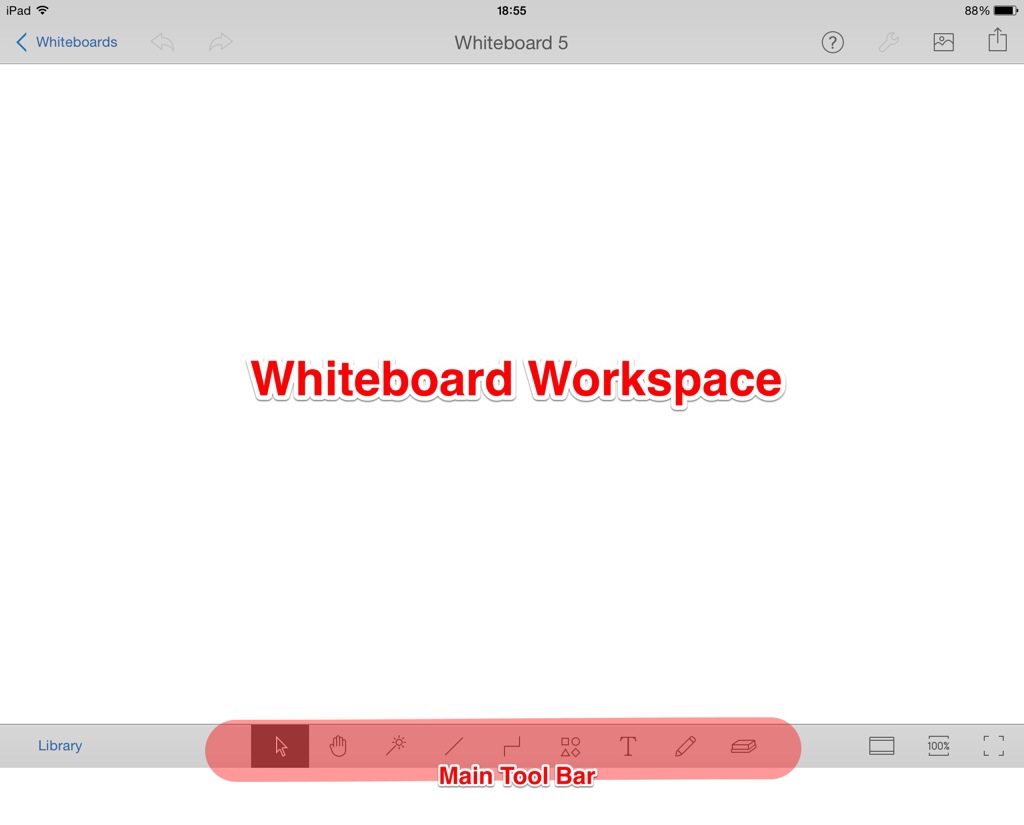
So let’s look at all of the available tools.

Click thumbnails to see quick tips screenshots.
Draw Tool
The options for the Draw Tool are
- pen type
- velocity sensitivity
- thickness
- opacity
- colour
You can select form two types of pen: line pen and highlight pen. You can select either pen to be velocity sensitive or not. Thickness can be adjusted from 1 to 44. There are ten colours to choose from, black, white, grey, red, orange, yellow, purple, green, blue and brown, plus a “no colour” option. Opacity can be adjusted from 0% to 100%.
Also an extra option appears to the right of the main tool bar for this tool which allows you to group lines immediately after they have been drawn.
Line Tool
The options for the Line Tool are
- style
- type
- thickness
- colour
There are three line styles to choose from: solid, dashed or dotted lines. They are also be of the types no arrow, single arrow (to starting point), single arrow (from starting point), or double arrow. Thickness can be adjusted from 1 to 14. There are ten colours to choose from: black, white, grey, red, orange, yellow, purple, green, blue and brown, and a “no colour” option.
Elbow Tool
The options for this tool are the same as the Line Tool described above.
Shapes Tool
The options for this tool are the same as the Line and Elbow Tool except 1) the type option shows four shapes (square, circle, triangle and diamond) instead of lines, and 2) there is an extra opacity option (from 0% to 100%) for the shape surface.
Text
The options for the Text Tool are
- font size
- font style
- alignment
- text/textbox/textbox-area switch
- colour
The font size can be changed with the number wheel or increase-decrease buttons. The text maybe made bold (but not italics or underlined). Text can aligned in relation to the text box also (left, centre or right align). Both the background and textbox outline can be changed from the default ‘transparent’ to any colour on the palette (see Draw Tool).
Eraser
Select the object(s)s to be erased or else select the eraser then tap individual objects, or else swipe large areas to delete multiple objects. All to-be-deleted objects will turn to a faded colour and be deleted upon release of finger.
Select Tool
The Select Tool can be in either the ‘unlocked’ or ‘locked’ mode. In the ‘unlocked’ mode only one object may be selected and manipulated. But in the ‘locked’ mode multiple objects may be selected then manipulated. Tap the icon once (grey background) for ‘unlocked’ mode. Tap the icon again to put into ‘locked’ mode (blue background).
Hand Tool
There are no additional options for this tool. Use the Hand Tool to navigate the whiteboard with a single finger (rather than the two-finger swipe).
Laser Pointer
There are no additional options for this tool. Tap and hold at where you want a green laser pointer to show on the projector screen.
Additional Features
In addition to the main tools you can do the following also:
Quick Navigation and Zooming
There are two buttons on the bottom right, one for zooming 100% on the current centre of the screen and one for fitting the entire whiteboard on-screen.
Snap Lock
Objects such as shapes and icons can be snapped together with lines and elbows when these are brought near to an object’s edge.
Add Ready-Made Icons
Icon libraries are included with Zamurai for popular topics presented. In addition to this you can create and import your own icon library online.
Import Photos
Photos and images from your photo album can be added to the whiteboard.
Object Properties
An objects properties can be accessed and changed by selecting an object then double tapping it. Alternatively you can select it then access the properties via the spanner button located on the top right.
Shift An Object’s Layer
An object’s layer (where it is in stacked objects) can be shifted via the spanner button located on the top right.
Tweak External Display Settings
How your whiteboard looks and responds to the objects can be accessed by the screen button on the bottom right. This includes hiding your toolbars and keyboards from your on-screen viewers.
Export
Export your whiteboard via email as a whiteboard (.zwb) file or PDF, or as an image to your photo library.
Organize Your Whiteboards
Organize your whiteboards by renaming them or by moving them into folders.
Get More Help
You can get help via graphical tips inline or through videos as well as from the Zamurai Community of users and programmers online.
Conclusion
I have been pleased with Zamurai since using it for teaching. Here are quick lists of pros and cons of the product.
Pros
- well designed user interface layout with minimal clutter
- designed and responds specifically for (most) projector whiteboard needs
- exports to useful formats (jpg, PDF and .zwb whiteboard)
- light and responsive in loading and running
Cons
- no direct icon creation (must rely on online facility)
- no Keynote-style remote control function
- no backup to the cloud (example: Dropbox)
- not available for use on the iPhone (though I can see how impractical that would be on its small screen)
This app has been around as a product since August 2013 (almost one year at the time of writing). And according to its website it had been in the making some two years before that. It is also the only product Zamurai Corporation (a three-man team) produces (so far) meaning all efforts are focused on this great app rather than spread across several products. It’s not perfect but it comes close. The shortcomings listed in the cons are not that big a problem considering it has done all that I need so far. It is a slick package and it should continue to do well and become more popular. I am looking forward to version 3. The learning curve had not been steep at all, at least it wasn’t for me. And at USD9 for the full product it is more than reasonable especially if you use it as much as I have since purchasing it.
Product catchphrase: “The whiteboard for today’s mobile generation™”.
[Note: The Zamurai (Version 2.4.0 (147)) app was tested on a 16GB Apple iPad Air running iOS7.1.2 connected to a standard lecture hall projector/screen set up via a genuine Apple Lightning to VGA connector. It was also tested on a HDTV via a genuine Apple Lightning to HDMI connector.]

Leave a comment